Wednesday, August 26, 2009
Where to buy bulk flowers
As a DIY crazy person such as myself, I have had a little experience in making bouquets and boutonnieres and centerpieces. It is something I want to do for my wedding. I will want some more experience before I launch right in and I will probably need the help of some sisters/friends, but with a limited number of brown and green flowers, this is the main reason why I chose cream as a third neutral color in my color scheme. Cream flowers are everywhere and I love cream more than a starch white.
(rose source has green roses)
(green calla lilies with brown spider daisies?)
Sunday, August 23, 2009
Saturday, August 22, 2009
Wednesday, August 19, 2009
vintage tea length
Making a birdcage veil
Making a veil at home can be just as simple as hunting for one. This birdcage veil was custom made for the bride above, Halligan Norris Smith. The assemblage process took only a couple of hours and shopping for the materials was even less time. The best part is that you have the custom veil you wanted, for much less money.
Materials & Tools
-4×4 Square of felt
-1/2 yd of 9 or 8” wide Russian veiling
-Hat combs (optional, bobby pins may substitute)
-Fabric glue
-Good luck charm
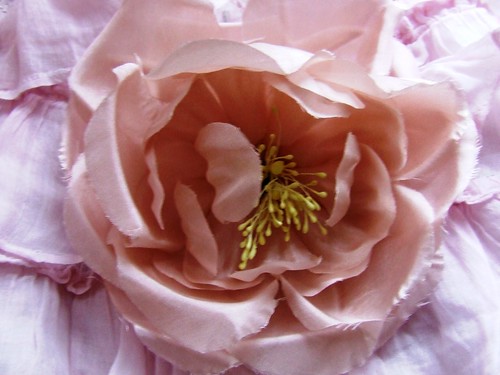
-3 silk or fabric flowers, source: craft store, tinseltrading.com
-8 filler flowers, millinery or small silk flowers work well
-Needle & thread
-Scissors
-Straight pins
-Ruler/ measuring tape
Instructions
Step 1-Cut heart from felt using template or freehand
Step 2-Cut veiling to 14” piece, if you want a fuller veil add an inch or two, demonstrate fullness by gathering the fabric in one hand. When cutting, be sure to cut just below the “knots”
Step 3-With needle and thread make a continuous running stitch starting with a cut edge, then work needle along one finished edge and thru the other cut edge. Leaving opposite finished edge open. Be sure to catch each stitch through the “knots” of the veiling.
Step 4- Gather to fit on felt heart, then tack down by stitching with needle and thread. At this point play with veiling and placement using a model head or in the mirror. If using combs, attach now to opposite side of heart that veil is attached to.
Steps 5 & 6-Pin flowers to heart, on top of veiling to figure out best placement, then tack down with needle and thread or glue into place.
Step 7-Once main flowers are set into place add filler flowers, good luck charms or trims to your liking. Set flowers by gluing stem ends and sticking them in-between main flowers. Charms or trims can be added with needle and thread.
http://www.housefabric.com/ProductDetail.asp?ProductID=17254
pinwheels!
What You’ll Need (for the pinwheels)
Pinwheel Instructions
1. Begin by measuring and cutting several 6″ inch squares out of your paper.
2. Find the center of your one of the squares and mark it by poking a hole through it with your pushpin. (see figure 1)
3. Lay your paper pattern side down, and use your ruler to draw diagonal lines from each corner to make an “X”. (see figure 1)
4. Cut along the diagonal lines, from all four corners, stopping one inch before you meet the hole in the center of your paper. (see figure 2)
5. Use your pushpin to make a hole in the right hand corner of each side of the square, just to the left of the line you just cut. (see figure 3)
6. Use your punch to cut out a paper flower. Stick your round-headed pin through the center of the flower. (see figure 3)
7. One by one, bring each of the four pin-holed corners to the center and stick the flower and pin through each of the four holes. (see figure 4 and 5)
8. Next, put the pin through the hole in the center of the square and set aside.
9. Make a pilot hole, using your pushpin, 1/2 inch down from the end of the dowel.
10. Put a drop of hot glue on the hole, and quickly insert the pin that runs through the pinwheel center into the glue and dowel. (see figure 6 and 7) Be careful not to let the pinwheel paper touch the glue on the dowel while it’s drying. If it sticks, it can’t spin.
11. Arrange your completed pinwheels in a vase or container like flower stems.